Marketing hacks is a series of articles in which I will share with you exciting hacks, tips and tricks that I'm learning during my digital marketing journey.
Today's hack will help you to track off-line conversions such as email or call conversions. We will use Visuality's example of how we track the source of our leads.
Marketing Stack
To understand this article you need a basic knowledge of Google tag manager, Google analytics, a bit of Javascript and HTML.
Task
Definition of Done: Track conversions accurately at visuality.pl from our contact@visuality.plemail depending on the source of the traffic.
How it works: Click on contact@visuality.pl to send the email.
Challenges:
- Clicking on the email doesn't mean the email is sent.
- Some people copy the address and send the email from their Gmail, outlook, etc.
- Not everyone has an email app installed.
Solution:
- Change the email displayed on our page depending on the medium/source the user is coming from.
- Create a mailbox per campaign source.
1) Create a specific email per medium/source
In our example: recruitment@visuality.pl
2) Create a specific UTM URL
In our example: http://www.visuality.pl/contact?utm_source=recruitment
You can create your UTM here: https://ga-dev-tools.appspot.com/campaign-url-builder/
3) Create your Javascript code:
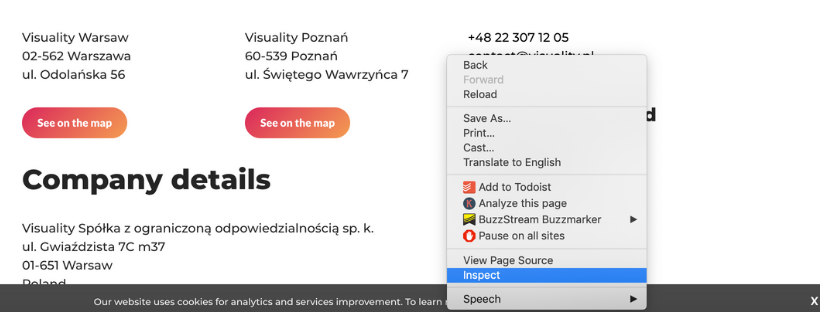
- Find the fragment of code you want to change via the right click of the mouse and choose "Inspect".
Inspect your page
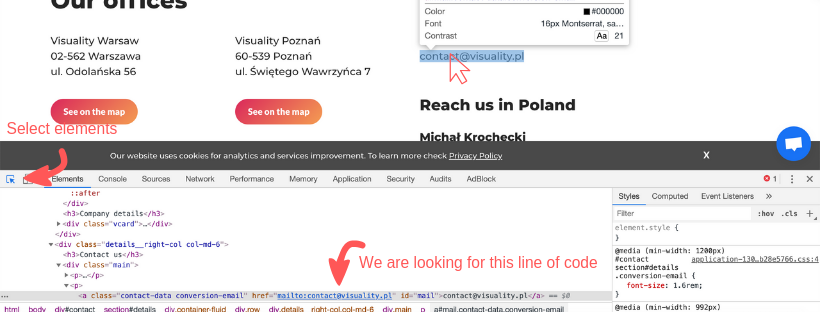
- Use "Select an element" and click on the link.
Select an element
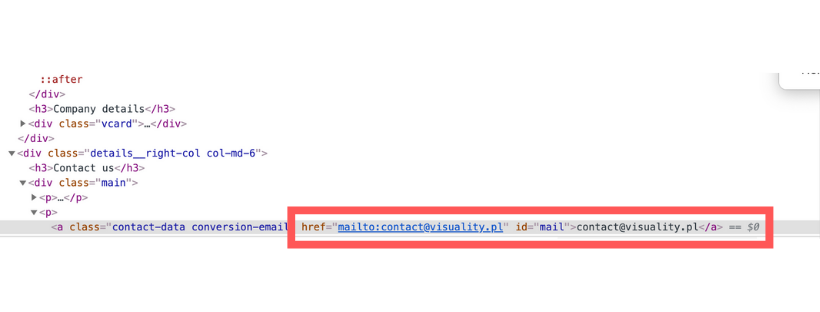
- Copy and paste this line of code into a doc. We will need it later on.
In our example:
You have to change what is in bold in your data
<script>

<! --- this line is going to change what you see →

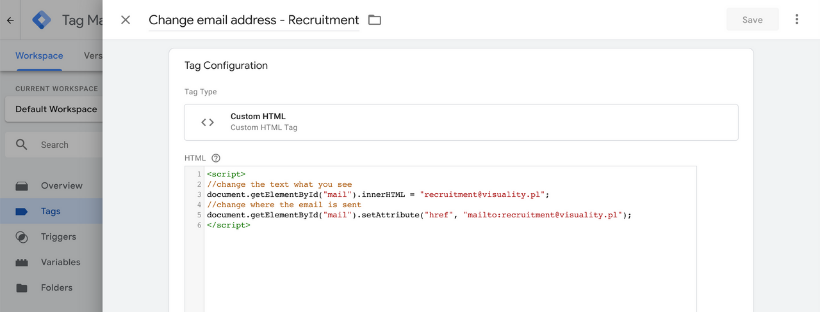
document.getElementById("mail").innerHTML = "recruitment@visuality.pl";

<! --- this line is going to change where the email is sent →

document.getElementById("mail").setAttribute("href", "mailto:recruitment@visuality.pl");

</script>
A little explanation here:
This script finds every element that has the id "mail" and changes the content (innerHTML) to a given value and also changes the attribute href** to a given value.*
With the example above, you can replace only ONE elementon the website. BUT if you want to, it's possible to tweak the code a bit and replace more elements (let's say there are many email links on one website).
In this case, you have to use a "class" selector which actually CAN be repeated many times (also be careful it the class concerns only the elements you want to change).
But since document.querySelectorAll() will give you an array (a kind of list) of all elements with a given class ("some-class" in this example) you have to go through this array, thus the code would look differently:
<script>

var links = document.querySelectorAll('.some-class');\
links.forEach(function(el) {\
    el.innerText = "recruitment@visuality.pl";\
    el.setAttribute('href', "mailto:recruitment@visuality.pl")\
})

</script>
More info: https://developer.mozilla.org/en-US/docs/Web/API/Document/getElementsByClassName#Examples
*By the way, there should be only ONE element with the same ID, so think of it as unique identification, but also be careful as some frontend developers make a mistake of using the same id twice.
**Href tells what should happen after clicking a link --- in this case its "mailto" action, but it can also be a URL to visit "http://www.visuality.pl/" or a phone number to call "tel:+48123456789")
4) Implement with Google Tag Manager
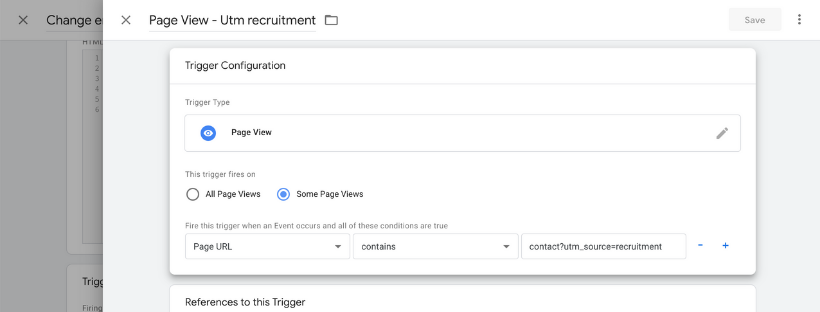
- Create a Trigger: Page view --- fires on Page URL contains contact?utm_source=recruitment
- Create a Tag: Custom HTML and copy paste your Javascript code from step 3.
- Link the Trigger and Tag together and refresh the preview in GTM.
5) Send the conversion to Google analytics
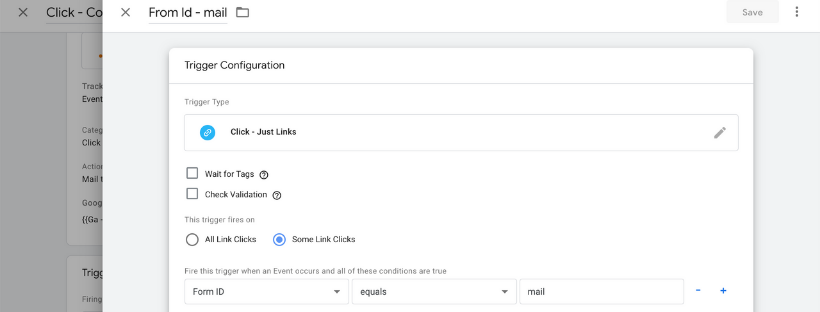
- Create a Trigger in GTM: Click --- Just Links --- Fires on some clicks --- Form ID equals mail
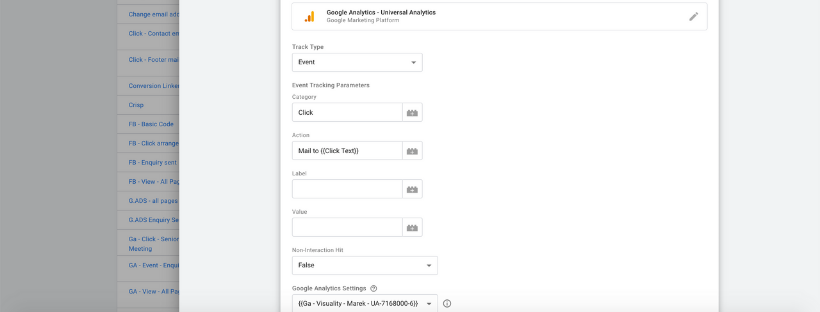
- Create a Tag in GTM: Google Analytics --- Universal Analytics Track type: Event Category: Click Action: mail to {{click text}} Google analytics settings: Your google analytics variable
- Link the Trigger and Tag together and refresh the preview in GTM.
6) Test
- Make sure your Google Tag manager is on Preview mode and refreshed.
- Past simply the Complete UTM URL into your browser and it should work.
Testing
Limitations of this method:
- You need to create a mailbox per campaign (or use aliases which makes things easier)
- You can track the clicks on a specific mailbox in Google analytics but not the conversion. You need to check the inboxes.
You can use this method in many other ways.
For instance, you could personalize your landing page depending on the UTM of your campaign. That's pretty cool :)
Follow us if this is something you would like to read about.
Conclusion
This is a cool method that you can use for a small scale campaign tracking campaign, but you will need some basic skills in Google tag manager, Google analytics, Javascript and HTML.
I tried to make it as easy to follow as possible. Let me know in the comments if you don't understand something or you would like to add some additional information. I will update the article regularly. Don't forget to follow us if you want the content!
If you're interested in more blog posts like this please visit our Visuality Blogor our Medium Page
Thank you Michał for your help with Javascript!
Learn for free:
Google tag manager and Google analytics: Measure school
Javascript and HTML: https://www.w3schools.com/

